Showing posts with label Blog Customization. Show all posts

Blogger: How to Eliminate Image Borders Altogether using CSS

By default, Blogger places a border and shadow around images. If you don't want these, you have two options.

You can eliminate them altogether by adding CSS code. The ability to add CSS code was an option in all themes when we looked in September, 2020.

Or you can make image borders transparent—an option in two popular themes, Simple and Awesome, and instructions are here: How to Remove an Image Border (or Choose a Color) in New Blogger!

This article provides some popular CSS code that removes image borders and also preserves transparency in PNG images. Be sure and see the "before" and "after" images below.


Get Read to Customize the Theme

Go to Blogger and select the appropriate blog. On the dashboard's left sidebar, click Theme. Then, in the window on the right side, click the Customize button (NOT the arrow by it).


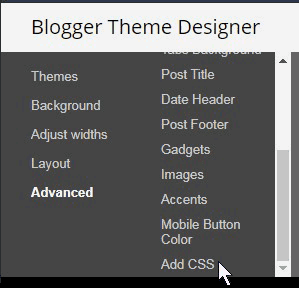
Find Add CSS Option on the Advanced Menu

Now you'll see various options on the left sidebar. Go to the bottom of the sidebar and click the down arrow next to Advanced.

What you see next are the customizing options for "Page Text" - which just happens to be the first item in a scrollable menu showing many items for which you can customize color or font. Click the arrow to the right of Page Text. Then scroll to the bottom and click Add CSS as shown in the image below.


Add the CSS Code

Aftr you click Add CSS, place your cursor (click) in the line below that displays and says Add custom CSS.


Now copy the code below and paste it into this text box.


img {
padding: 0 !important;
border: none !important;
background: none !important;
-moz-box-shadow: 0px 0px 0px transparent !important;
-webkit-box-shadow: 0px 0px 0px transparent !important;
box-shadow: 0px 0px 0px transparent !important;
}

Your left sidebar should now look like the image below. You can use the scroll bar to see the first part of the CSS you just entered.


Save Your Changes

Be sure to save your changes by clicking the SAVE icon located in the bottom right corner of the window as shown in the image below.

Note: the next time you click Advanced, the "Add CSS" option will display by default. Blogger will display the options for the last item in the list that you customized.


Before and After Images

We thought you'd enjoy seeing the effect of this code in a real blog using the Watermark theme. The top image is a JPG. The bottom image is a PNG with the area around the smiley face transparent.

Before adding the CSS code:

After adding the CSS code:


Summary

CSS stands for Cascading Style Sheets. CSS code tells the browser how to style a web page. The code above is not hard for webmasters, but we're lazy and copied it from one of our favorite websites, stackoverflow.com.


Disclaimer: As always, we do our best to provide accurate, easy-to-understand information for our blog visitors. However, we will not be held responsible for inadvertent errors, nor should any visitor infer that we are providing technical advice or guarantees. No two themes are alike, so not all solutions will work with all themes. In addition, we do not have the resources to respond to technical questions or provide individual technical assistance. More information can be found in our terms and policies webpage.

How to Remove the Image Border or Choose a Color in New Blogger!

As you know, Google started to automatically add borders and shadows to our images and image captions a while back. To get rid of these borders, here are your two options as tested themes in September, 2020:

Option #1: Customize the theme to make image borders transparent (or another color). Two themes support this: Simple and Awesome.

Option #2: Add CSS code to eliminate image borders altogether. We explain how to do this in a separate article How to Eliminate Image Borders in Blogger via CSS.

This article explains how to use option #1. OK, let's go.


Click Customize under Theme Options

Go to your blog and click Theme on the left sidebar of the blog dashboard. Then click the Customize button, NOT the arrow to the right of the button as shown below.


Display the Advanced Menu

At the bottom of the left sidebar you'll see Advanced. Click the down arrow to the right of Advanced and the Advanced menu displays.

On the Advanced menu you can make color changes to all the items listed at the bottom of this post**.


Display Customization Options for Images

What you see first are the customizing options for Page Text, right? Well, Page Text is just the first option in a column of items that you can customize. So click the down arrow by "Page Text" and a list of items will appear with a vertical scroll bar (see first image below).

Scroll down to nearly the bottom of the list and click on Images as shown in the second image below.


Select Transparent or a Color for Borders and More

Now you'll see options for images. You can select Transparent or a color for three image elements: Background Color, Border Color, and Caption Text Color. Push the selector to the right to select a transparent border and make any other changes. The manu for Border Color is shown below.

Clicking Add brings up a greater selection of colors and an option to add a custom color.


Save Your Changes

Now SAVE your changes! The Save icon is located in the bottom right corner as shown below. Click the Save icon to save the changes you have made.

We're done!


** Clicking the arrow by "Page Text" shows the entire list of items whose colors and possibly font sizes can be customized. There is also a place to add custom CSS. Besides Images, the list includes: Backgrounds, Links, Blog TItle, Blog Description, Tabs Text, Tabs Background, Post TItle, Date Header, Post Footer, Gadgets, Accents, Mobile Button Color, and Add CSS.


Thanks for stopping by. We hope you found the solution you were seeking. Cheers!


Removing Image Borders in Classic Blogger

If you are using the Simple or Awesome theme in New Blogger and would like to remove the image borders by making them transparent (or a different color), please see our step-by-step instructions at How to Remove the Image Border or Choose a Color in New Blogger (themes last checked September, 2020).

But don't despair. If you aren't using either of these themes and want to rid yourself of image borders, you do have an option: add CSS code. We provide detailed instructons at How to Eliminate Image Borders Altogether using CSS.


This blog post was for Classic Blogger, and also only applicable for those using the Simple or Awesome theme. We keep it around for archive purposes and to redirect visitors to the appropriate posts..

Step One

Go to the Blogger dashboard and click Theme on the left sidebar. Then click the Customize button. You should find the customize button in your blog according to one of the two screenshots shown below.


The Blogger Theme Designer window displays as shown below. If you see something else, you're probably using New Blogger and need to visit our new post How to Remove the Image Border or Choose a Color in New Blogger!.

Step Two

On the Blogger Theme Designer window, click Advanced at the bottom of the left sidebar. A row of items will display on the right side of the small window. Then scroll down to the bottom of the list on the right side and click Images as shown below.


Step Three

The options for images are Background Color, Border Color, and Caption Text Color. Look at Border Color. We can't remove the border, but we can either make it transparent so the background color of the blog post will peek through, or select a color. If your background is white, you could just select white for your image borders.


As shown above, make the borders transparent by clicking the down arrow on the top row, then, in the small window that pops up, click Transparent at the bottom of the window.


Step Four

Now click Apply to Blog. Sometimes that option is not highlighted until I click around on some other tabs, but when it finally highlights, make sure you click Apply to Blog or your settings will be lost.


Thanks for stopping by. Cheers!

How to Add CSS Code in Classic Blogger

Using New Blogger? We provide step-by-step instructons on adding CSS code in our post Adding CSS Code to Eliminate Image Borders. Just follow the directions right to the end and enter your CSS code instead of ours and you'll be all set!


Classic Blogger went away in 2020. We'll keep this blog post around for a while in case some folks still have access to it.

Step 1

From the Blogger dashboard click Theme on the left sidebar.

Step 2

Next, click the Customize button. The Blogger Theme Designer window should display as seen in the image.

Step 3

At the bottom of the left column click Advanced. The right side of the window displays a list of customizable items. Scroll to the bottom of the list and click Add CSS as shown in the image below.


Step 4

After clicking Add CSS, a blank area opens up to the right. Type the CSS code you want to add, or copy and paste into this area.


Step 4

When finished, don't forget to save your changes by clicking the SAVE button.


How to Make Your Blog Template Wider

Many mainstream websites now default to a width of about 940px - a safe width for 19" monitors. Since a limited number of web users have monitors of a smaller width, this is something you may wish to consider. Setup your Layout, widgets, and create at least one blog post before proceeding so you can see the changes you are making.

If your XML template has background images, changing widths may cause these images to no longer fit. You may have to disable some background images if increasing the width of your blog is important to you. As you make each change and Preview the result, make a note of which object was changed when a background image is no longer usable. See more at the bottom of this post.

Also, always type a comment on the line of code you changed that includes the original value. This not only helps if you want to start over, but it’s good to know which lines of HTML code you have changed. To change the width of your blog, follow these instructions. Only change the "width" or "min-width" line of code and ignore the other lines of code.


Get into your blog Layout and click Edit HTML. Click Download Full Template to save a fresh copy of your template to disk.

Press Ctrl-F to open the "find" box, and with your cursor in the "find" box, press the space bar and then type width. Press Next.


Changing Entire Blog Width to 940px

Your first stop should be the header-wrapper code and/or the body code. Both are shown below. If they have a width or min-width specified, it will be 660px or another large number. Change the value to 940px as shown below. Click Preview.


#header-wrapper {
width:940px; /* changed; value was 660px */
margin:0 auto 10px;
}

body {
margin: 0;
text-align: center;
min-width:940px; /* changed; value was 660px */
background: #4386ce url(http://whatever/image.gif) repeat-x $startSide top;
color: $textColor;
font-size: small;
}


Press Next again by the "find box" and you should see the outer-wrapper. The outer-wrapper also contains the entire blog width. Make the change as shown below, and preview your blog.


#outer-wrapper {
width:940px; /* changed; value was 660px */
margin:0 auto;
padding:10px;
text-align:$startSide;
font: $bodyfont;
}


If you find a DIV called #content-wrapper which has the wide width, change it as well, and Preview.


#content-wrapper {
position: relative;
width:940px; /* changed; value was 660px */
background: #4386ce url(http://whatever/image.gif) repeat-y $startSide top;
}


Changing Main Area and Sidebar Widths

Now we must tell Blogger how to divvy up the width between the main portion of the blog (main-wrapper) and the sidebar (sidebar-wrapper). From the "find" box, press Next until you find the main-wrapper. The code for side-wrapper will probably be 4 or 5 items further down. The sum of the widths of main-wrapper and side-wrapper must be less than 940px or overlapping will occur due to margins.

My main-wrapper is 675px and my sidebar is 256px - for a total of 931px. Enter your desired width values for main-wrapper and side-wrapper and then Preview your blog for overlapping. When no more overlapping occurs, tweak the width values to suit.


#main-wrapper {
width: 675px; /* changed; value was 410px */
float: $startSide;
overflow: hidden;
}

#sidebar-wrapper {
width: 256px; /* changed; value was 220px */
float: $endSide;
overflow: hidden;
}


You may find other IDs and classes that have a width, such as #header .description. If your blog looks fine on Preview, do NOT change any other widths.

Disabling Background Images

Some XML Blogger templates include a footer in order to present a decorative image for the bottom of the blog. As mentioned above, increasing the width of the blog will mess up these background images and you will have to disable them.

When disabling background images, don't delete any code but just disable the image from displaying by adding several XXXXX immediately after ".gif" in the code. As you customize your template, you may not be sure which background image is which. Hopefully you took notes as you changed widths. In any case, disable one at a time and then Preview. If your change did not disable one of the unusable background images, remove the XXXXX and go to the next background image. For the Thisaway template, I had to disable background images for the following DIVs:

#content-wrapper, #main, #sidebar, #sidebar-wrapper, #footer-wrapper


Indenting Wrapped Lines of Titles or Labels on the Sidebar

If you have post titles or labels on the Sidebar that wrap to a second line, this can make the list hard to read.

This is especially true when the list of post titles is generated from a feed because the post titles are not listed in alphabetical order, but in chronological order.

The image below shows an example of post titles that wrap to a second line:


The links would be easier to read if the wrapped lines were indented, as pictured.


The instructions for making this change are below. But first let's discuss our technique. This has worked on the templates we have tested, but there are many templates, and your template may use different variables.

We are modifying the CSS code for .sidebar li. The li tag stand for link. Here is the modified code:

.sidebar li {
padding-top: 0;
text-indent:-14px;
padding-$endSide: 0;
padding-bottom: 4px;
padding-$startSide: 24px;
background: url(http://www.xxx.com/image.gif) no-repeat $startSide 3px;
}


Only two changes are made. First, we increase the value of padding-$startSide from 17px to 24px. This specifies the number of pixels that the Sidebar links, no matter how many lines, indent from the left side of the Sidebar.

Secondly, we add text-indent:-14px to the code. This negative margin causes the first line only of each link to move left (or "outdent") a small amount to achieve the look we want.

To make this change, follow these directions:
  1. Go to your blog's Layout tab and click Edit HTML
  2. Download a copy of your template to disk for backup.
  3. Press Ctrl-F, type .sidebar li in the Find box, and click Next until you have found the CSS for .sidebar li.
  4. If you didn't download your template, copy the code for .sidebar li and paste it into a Notepad file - in case you need to undo the changes you are attempting.
  5. Increase the value of padding-$startSide.
  6. Place your cursor after the first line of code and press Enter to create a blank line. Then type text-indent:-14px
  7. Click Preview. Adjust these two values until satisfied and click Save Template.


If this post has been helpful, please consider linking to our blog or sharing!  Bookmark and Share